
728x90
반응형
문제
입력 폼과 생성하기 버튼 화면을 구현해야하는데
입력폼은 위로 배치하고 생성하기 버튼은 바닥으로 내리고 싶은 상황이었다.
(이것들은 Column으로 구성하고 있었다)
구글링을 해보니 Spacer() 라는 게 있어서 사용해봤다.
import 'package:flutter/cupertino.dart';
import 'package:flutter/material.dart';
import 'package:flutter_form_builder/flutter_form_builder.dart';

class AddPartyScreen extends StatefulWidget {
  const AddPartyScreen({Key? key}) : super(key: key);

  @override
  State<AddPartyScreen> createState() => _AddPartyScreenState();
}

class _AddPartyScreenState extends State<AddPartyScreen> {
  @override
  Widget build(BuildContext context) {
    return Scaffold(
      appBar: AppBar(
        title: Text('파티 생성'),
      ),
      body: Container(
        child: Column(
          crossAxisAlignment: CrossAxisAlignment.center,
          children: <Widget>[
            Container(
              child: TextFormField(
                decoration: InputDecoration(
                  labelText: '파티명',
                  hintText: '파티명을 입력하세요',
                  border: OutlineInputBorder(),
                ),
              ),
              padding: EdgeInsets.all(5),
            ),
            Container(
              child: FormBuilderDateTimePicker(
                name: '날짜',
                inputType: InputType.date,
                decoration: const InputDecoration(labelText: '날짜'),
              ),
              padding: EdgeInsets.all(5),
            ),
            Container(
              child: FormBuilderDateTimePicker(
                name: '시간',
                inputType: InputType.time,
                decoration: const InputDecoration(labelText: '시간'),
              ),
              padding: EdgeInsets.all(5),
            ),
            Container(
              child: TextFormField(
                decoration: InputDecoration(
                    labelText: '장소',
                    hintText: '장소를 입력하세요',
                    border: OutlineInputBorder()),
              ),
              padding: EdgeInsets.all(5),
            ),
            Container(
              child: TextFormField(
                minLines: 6,
                keyboardType: TextInputType.multiline,
                maxLines: null,
                //expands: true,
                decoration: InputDecoration(
                  labelText: '추가 설명',
                  hintText: '파티명을 입력하세요',
                  border: OutlineInputBorder(),
                ),
              ),
              padding: EdgeInsets.all(5),
            ),
            Spacer(),
            Container(
              child: ElevatedButton(child: Text('생성하기'), onPressed: () {}),
            ),
          ],
        ),
      ),
    );
  }
}그러자 원하는대로 생성하기 버튼은 아래로 잘 내려갔으나

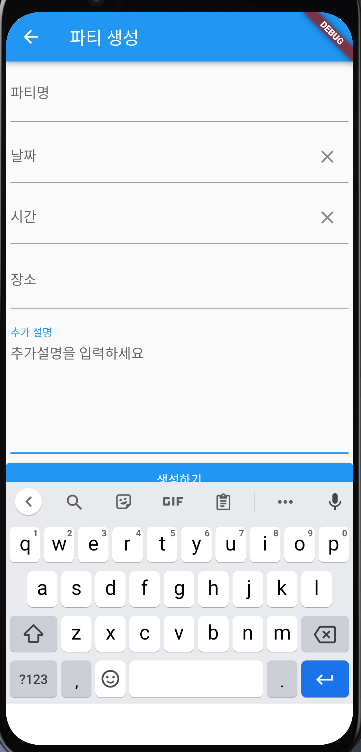
입력하려고 하면

이렇게 화면이 깨지는 문제가 발생했다.
해결
https://steemit.com/kr/@anpigon/flutter
[Flutter] 버튼 하단 고정 화면 구현하기 — Steemit
위와 같이 버튼 하단 고정된 화면을 구현하려고 한다면, Spacer 위젯을 사용하면 매우 간단하게 구현할 수 있습니다. 코드로 작성하면 다음과 같습니다. 하지만 입력이 필요한 화면에서 위와 같이
steemit.com
이 분의 코드를 참고하니 SingleChildScrollView 위젯과 Expanded 위젯을 이용하는 게 더 나아 보였다.
import 'package:flutter/cupertino.dart';
import 'package:flutter/material.dart';
import 'package:flutter_form_builder/flutter_form_builder.dart';

class AddPartyScreen extends StatefulWidget {
  const AddPartyScreen({Key? key}) : super(key: key);

  @override
  State<AddPartyScreen> createState() => _AddPartyScreenState();
}

class _AddPartyScreenState extends State<AddPartyScreen> {
  @override
  Widget build(BuildContext context) {
    return Scaffold(
      appBar: AppBar(
        title: Text('파티 생성'),
      ),
      body: Container(
        child: Column(
          crossAxisAlignment: CrossAxisAlignment.center,
          children: <Widget>[
            Expanded(
                child: SingleChildScrollView(
              child: Column(
                children: [
                  Container(
                    child: TextFormField(
                      decoration: InputDecoration(
                        labelText: '파티명',
                        hintText: '파티명을 입력하세요',
                      ),
                    ),
                    padding: EdgeInsets.all(5),
                  ),
                  Container(
                    child: FormBuilderDateTimePicker(
                      name: '날짜',
                      inputType: InputType.date,
                      decoration: const InputDecoration(labelText: '날짜'),
                    ),
                    padding: EdgeInsets.all(5),
                  ),
                  Container(
                    child: FormBuilderDateTimePicker(
                      name: '시간',
                      inputType: InputType.time,
                      decoration: const InputDecoration(labelText: '시간'),
                    ),
                    padding: EdgeInsets.all(5),
                  ),
                  Container(
                    child: TextFormField(
                      decoration: InputDecoration(
                        labelText: '장소',
                        hintText: '장소를 입력하세요',
                      ),
                    ),
                    padding: EdgeInsets.all(5),
                  ),
                  Container(
                    child: TextFormField(
                      minLines: 6,
                      keyboardType: TextInputType.multiline,
                      maxLines: null,
                      //expands: true,
                      decoration: InputDecoration(
                        labelText: '추가 설명',
                        hintText: '추가설명을 입력하세요',
                      ),
                    ),
                    padding: EdgeInsets.all(5),
                  ),
                  SizedBox(
                    width: double.infinity,
                    child:
                        ElevatedButton(child: Text('생성하기'), onPressed: () {}),
                  ),
                ],
              ),
            ))
          ],
        ),
      ),
    );
  }
}코드에 적용해보았더니
더이상 화면이 깨지지 않는다!
728x90
반응형