
문제
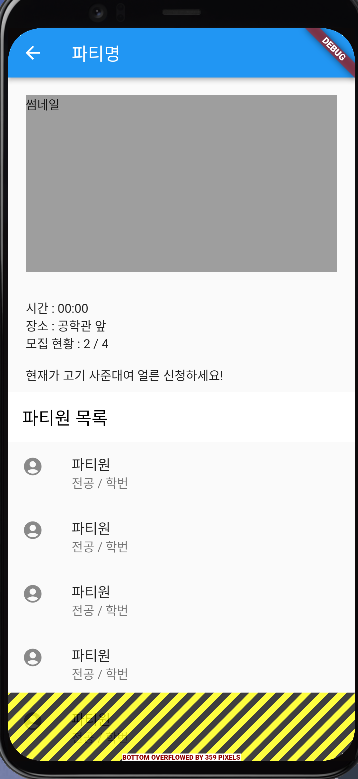
하단에 '신청 하기' 버튼을 (스크롤하더라도) 고정시키고 싶은데
화면이 깨지고 원하는대로 되지 않았다.
import 'package:flutter/material.dart';

class PartyScreen extends StatefulWidget {
  const PartyScreen({Key? key}) : super(key: key);

  @override
  State<PartyScreen> createState() => _PartyScreenState();
}

class _PartyScreenState extends State<PartyScreen> {
  @override
  Widget build(BuildContext context) {
    return Scaffold(
        appBar: AppBar(
          title: Text('파티명'),
        ),
        body: Column(
          children: [
            CustomScrollView(
              scrollDirection: Axis.vertical,
              shrinkWrap: true,
              slivers: [
                SliverToBoxAdapter(
                  child: Column(
                    crossAxisAlignment: CrossAxisAlignment.start,
                    children: [
                      Container(
                        color: Colors.grey,
                        margin:
                            EdgeInsets.symmetric(horizontal: 20, vertical: 20),
                        width: 500,
                        height: 200,
                        child: Text('썸네일'),
                      ),
                      Container(
                        padding: EdgeInsets.fromLTRB(20, 10, 20, 10),
                        child: Column(
                          crossAxisAlignment: CrossAxisAlignment.start,
                          children: [
                            Text('시간 : 00:00'),
                            Text('장소 : 공학관 앞'),
                            Text('모집 현황 : 2 / 4'),
                            Text('\n현재가 고기 사준대여 얼른 신청하세요!'),
                          ],
                        ),
                      )
                    ],
                  ),
                ),
                SliverAppBar(
                  automaticallyImplyLeading: false,
                  pinned: true,
                  title: Text(
                    '파티원 목록',
                    style: TextStyle(color: Colors.black),
                  ),
                  backgroundColor: Colors.white,
                ),
                SliverList(
                    delegate: SliverChildBuilderDelegate(
                        (c, i) => ListTile(
                              leading: Icon(Icons.account_circle),
                              title: Text('파티원'),
                              subtitle: Text('전공 / 학번'),
                            ),
                        childCount: 10)),
              ],
            ),
            Spacer(),
            SliverToBoxAdapter(
              child: ElevatedButton(onPressed: () {}, child: Text('신청하기')),
            )
          ],
        ));
  }
}
해결
구글링을 꽤 해봤는데
차라리 복잡하게 할바에 bottomNavigationBar에다가 버튼을 만드는 방법을 써보기로 했다.
https://stackoverflow.com/questions/54114221/flutter-fixed-button-in-customscrollview
Flutter Fixed Button in CustomScrollView
How to make a button Fixed "Sticky" in bottom of CustomScrollView How to achieve like the screenshot https://i.stack.imgur.com/RDCn9.png
stackoverflow.com
import 'package:flutter/material.dart';

class PartyScreen extends StatefulWidget {
  const PartyScreen({Key? key}) : super(key: key);

  @override
  State<PartyScreen> createState() => _PartyScreenState();
}

class _PartyScreenState extends State<PartyScreen> {
  @override
  Widget build(BuildContext context) {
    return Scaffold(
      appBar: AppBar(
        title: Text('파티명'),
      ),
      body: CustomScrollView(
        scrollDirection: Axis.vertical,
        shrinkWrap: true,
        slivers: [
          SliverToBoxAdapter(
            child: Column(
              crossAxisAlignment: CrossAxisAlignment.start,
              children: <Widget>[
                Container(
                  color: Colors.grey,
                  margin: EdgeInsets.symmetric(horizontal: 20, vertical: 20),
                  width: 500,
                  height: 200,
                  child: Text('썸네일'),
                ),
                Container(
                  padding: EdgeInsets.fromLTRB(20, 10, 20, 10),
                  child: Column(
                    crossAxisAlignment: CrossAxisAlignment.start,
                    children: [
                      Text('시간 : 00:00'),
                      Text('장소 : 공학관 앞'),
                      Text('모집 현황 : 2 / 4'),
                      Text('\n현재가 고기 사준대여 얼른 신청하세요!'),
                    ],
                  ),
                ),
              ],
            ),
          ),
          SliverAppBar(
            automaticallyImplyLeading: false,
            title: Text(
              '파티원 목록',
              style: TextStyle(color: Colors.black),
            ),
            backgroundColor: Colors.white,
          ),
          SliverList(
              delegate: SliverChildBuilderDelegate(
                  (c, i) => ListTile(
                        leading: Icon(Icons.account_circle),
                        title: Text('파티원'),
                        subtitle: Text('전공 / 학번'),
                      ),
                  childCount: 10)),
        ],
      ),
      bottomNavigationBar: Padding(
        padding: EdgeInsets.all(20),
        child: RaisedButton(
          onPressed: () {},
          color: Colors.blue,
          textColor: Colors.white,
          child: Text('신청 하기'),
        ),
      ),
    );
  }
}
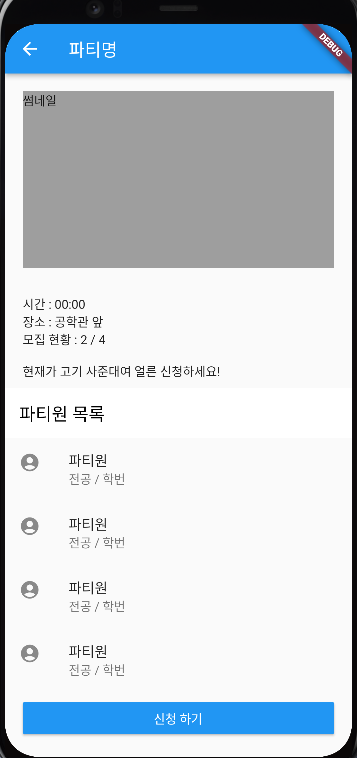
만약에 다른 더 좋은 방법을 찾으면 추가해두도록 하겠다.
문제
하단에 '신청 하기' 버튼을 (스크롤하더라도) 고정시키고 싶은데
화면이 깨지고 원하는대로 되지 않았다.
import 'package:flutter/material.dart'; class PartyScreen extends StatefulWidget { const PartyScreen({Key? key}) : super(key: key); @override State<PartyScreen> createState() => _PartyScreenState(); } class _PartyScreenState extends State<PartyScreen> { @override Widget build(BuildContext context) { return Scaffold( appBar: AppBar( title: Text('파티명'), ), body: Column( children: [ CustomScrollView( scrollDirection: Axis.vertical, shrinkWrap: true, slivers: [ SliverToBoxAdapter( child: Column( crossAxisAlignment: CrossAxisAlignment.start, children: [ Container( color: Colors.grey, margin: EdgeInsets.symmetric(horizontal: 20, vertical: 20), width: 500, height: 200, child: Text('썸네일'), ), Container( padding: EdgeInsets.fromLTRB(20, 10, 20, 10), child: Column( crossAxisAlignment: CrossAxisAlignment.start, children: [ Text('시간 : 00:00'), Text('장소 : 공학관 앞'), Text('모집 현황 : 2 / 4'), Text('\n현재가 고기 사준대여 얼른 신청하세요!'), ], ), ) ], ), ), SliverAppBar( automaticallyImplyLeading: false, pinned: true, title: Text( '파티원 목록', style: TextStyle(color: Colors.black), ), backgroundColor: Colors.white, ), SliverList( delegate: SliverChildBuilderDelegate( (c, i) => ListTile( leading: Icon(Icons.account_circle), title: Text('파티원'), subtitle: Text('전공 / 학번'), ), childCount: 10)), ], ), Spacer(), SliverToBoxAdapter( child: ElevatedButton(onPressed: () {}, child: Text('신청하기')), ) ], )); } }
해결
구글링을 꽤 해봤는데
차라리 복잡하게 할바에 bottomNavigationBar에다가 버튼을 만드는 방법을 써보기로 했다.
https://stackoverflow.com/questions/54114221/flutter-fixed-button-in-customscrollview
Flutter Fixed Button in CustomScrollView
How to make a button Fixed "Sticky" in bottom of CustomScrollView How to achieve like the screenshot https://i.stack.imgur.com/RDCn9.png
stackoverflow.com
import 'package:flutter/material.dart'; class PartyScreen extends StatefulWidget { const PartyScreen({Key? key}) : super(key: key); @override State<PartyScreen> createState() => _PartyScreenState(); } class _PartyScreenState extends State<PartyScreen> { @override Widget build(BuildContext context) { return Scaffold( appBar: AppBar( title: Text('파티명'), ), body: CustomScrollView( scrollDirection: Axis.vertical, shrinkWrap: true, slivers: [ SliverToBoxAdapter( child: Column( crossAxisAlignment: CrossAxisAlignment.start, children: <Widget>[ Container( color: Colors.grey, margin: EdgeInsets.symmetric(horizontal: 20, vertical: 20), width: 500, height: 200, child: Text('썸네일'), ), Container( padding: EdgeInsets.fromLTRB(20, 10, 20, 10), child: Column( crossAxisAlignment: CrossAxisAlignment.start, children: [ Text('시간 : 00:00'), Text('장소 : 공학관 앞'), Text('모집 현황 : 2 / 4'), Text('\n현재가 고기 사준대여 얼른 신청하세요!'), ], ), ), ], ), ), SliverAppBar( automaticallyImplyLeading: false, title: Text( '파티원 목록', style: TextStyle(color: Colors.black), ), backgroundColor: Colors.white, ), SliverList( delegate: SliverChildBuilderDelegate( (c, i) => ListTile( leading: Icon(Icons.account_circle), title: Text('파티원'), subtitle: Text('전공 / 학번'), ), childCount: 10)), ], ), bottomNavigationBar: Padding( padding: EdgeInsets.all(20), child: RaisedButton( onPressed: () {}, color: Colors.blue, textColor: Colors.white, child: Text('신청 하기'), ), ), ); } }
만약에 다른 더 좋은 방법을 찾으면 추가해두도록 하겠다.