[Kotlin] 계산기 - XML 사용법과 UI 생성법 배우기
ref : Udemy [Android 12 및 Kotlin 개발 완전 정복] 섹션 7
linearlayout 이란
뷰를 수평이나 수직으로 배치할 수 있는 레이아웃.
orientation 속성을 통해서 배치 방향을 결정할 수 있다.
vertical 로 설정하면 하위뷰들을 수직방향으로 배치하고
horizontal 로 설정하면 하위뷰들을 수평방향으로 배치한다.

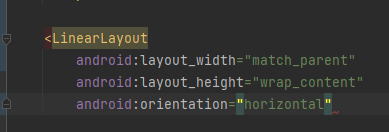
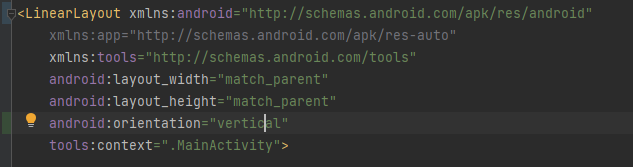
아이템들을 수평방향으로 정렬하려면 위와 같이 orientation을 horizontal로, 수직을 원한다면 vertical 로 설정
layout_weight 속성이란
자식 뷰에 가중치를 지정해서 그 비율만큼의 자식 뷰의 크기를 지정하는 속성.
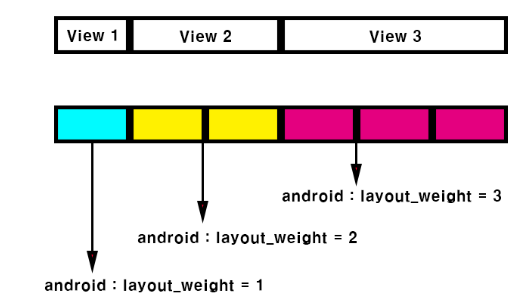
상위 뷰 그룹 하나와
그 밑에 하위 뷰 3개로 이루어진 화면이다.
layout_weight 를 각각 1,2,3 으로 부여했을 때 다음과 같이 나타낼 수 있다.
문자열을 넣고 싶을 때
이런건 하드코딩에 해당
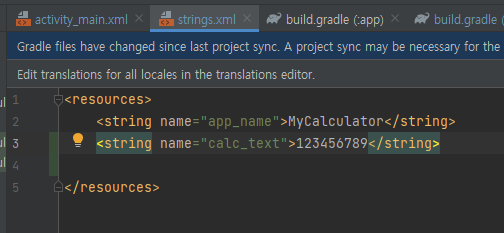
따라서 strings.xml 같은 파일에 따로 담는 것이 좋다.
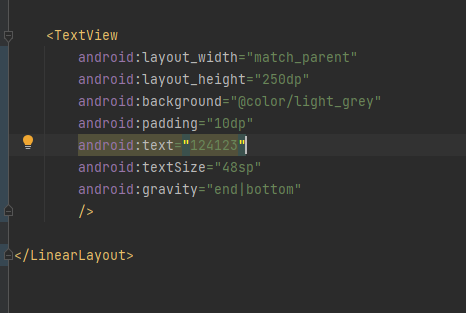
계산기 UI
<?xml version="1.0" encoding="utf-8"?>
<LinearLayout xmlns:android="http://schemas.android.com/apk/res/android"
xmlns:app="http://schemas.android.com/apk/res-auto"
xmlns:tools="http://schemas.android.com/tools"
android:layout_width="match_parent"
android:layout_height="match_parent"
android:orientation="vertical"
tools:context=".MainActivity">
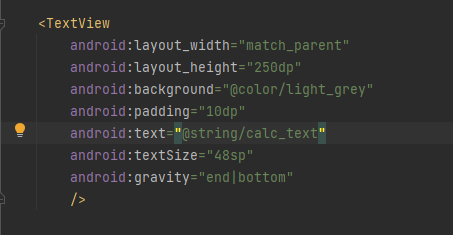
<TextView
android:layout_width="match_parent"
android:layout_height="250dp"
android:background="@color/light_grey"
android:padding="10dp"
android:text="@string/calc_text"
android:textSize="48sp"
android:gravity="end|bottom"
/>
<LinearLayout
android:layout_width="match_parent"
android:layout_height="wrap_content"
android:orientation="horizontal"
android:layout_weight="1"
>
<Button
android:layout_margin="2dp"
android:id="@+id/btnSeven"
android:layout_width="0dp"
android:layout_height="match_parent"
android:layout_weight="1"
android:onClick="onDigit"
android:text="@string/_7"/>
<Button
android:layout_margin="2dp"
android:id="@+id/btnEight"
android:layout_width="0dp"
android:layout_height="match_parent"
android:layout_weight="1"
android:onClick="onDigit"
android:text="@string/_8"/>
<Button
android:layout_margin="2dp"
android:id="@+id/btnNine"
android:layout_width="0dp"
android:layout_height="match_parent"
android:layout_weight="1"
android:onClick="onDigit"
android:text="@string/_9"/>
<Button
android:layout_margin="2dp"
android:id="@+id/btnDivide"
android:layout_width="0dp"
android:layout_height="match_parent"
android:layout_weight="1"
android:onClick="onDigit"
android:text="@string/Devide"/>
</LinearLayout>
<LinearLayout
android:layout_width="match_parent"
android:layout_height="wrap_content"
android:orientation="horizontal"
android:layout_weight="1"
>
<Button
android:layout_margin="2dp"
android:id="@+id/btnFour"
android:layout_width="0dp"
android:layout_height="match_parent"
android:layout_weight="1"
android:onClick="onDigit"
android:text="@string/_4"/>
<Button
android:layout_margin="2dp"
android:id="@+id/btnFive"
android:layout_width="0dp"
android:layout_height="match_parent"
android:layout_weight="1"
android:onClick="onDigit"
android:text="@string/_5"/>
<Button
android:layout_margin="2dp"
android:id="@+id/btnSix"
android:layout_width="0dp"
android:layout_height="match_parent"
android:layout_weight="1"
android:onClick="onDigit"
android:text="@string/_6"/>
<Button
android:layout_margin="2dp"
android:id="@+id/btnMultiply"
android:layout_width="0dp"
android:layout_height="match_parent"
android:layout_weight="1"
android:onClick="onDigit"
android:text="@string/multiply"/>
</LinearLayout>
<LinearLayout
android:layout_width="match_parent"
android:layout_height="wrap_content"
android:orientation="horizontal"
android:layout_weight="1"
>
<Button
android:layout_margin="2dp"
android:id="@+id/btnOne"
android:layout_width="0dp"
android:layout_height="match_parent"
android:layout_weight="1"
android:onClick="onDigit"
android:text="@string/_1"/>
<Button
android:layout_margin="2dp"
android:id="@+id/btnTwo"
android:layout_width="0dp"
android:layout_height="match_parent"
android:layout_weight="1"
android:onClick="onDigit"
android:text="@string/_2"/>
<Button
android:layout_margin="2dp"
android:id="@+id/btnThree"
android:layout_width="0dp"
android:layout_height="match_parent"
android:layout_weight="1"
android:onClick="onDigit"
android:text="@string/_3"/>
<Button
android:layout_margin="2dp"
android:id="@+id/btnSubtract"
android:layout_width="0dp"
android:layout_height="match_parent"
android:layout_weight="1"
android:onClick="onDigit"
android:text="@string/subtract"/>
</LinearLayout>
<LinearLayout
android:layout_width="match_parent"
android:layout_height="wrap_content"
android:orientation="horizontal"
android:layout_weight="1"
>
<Button
android:layout_margin="2dp"
android:id="@+id/btnZero"
android:layout_width="0dp"
android:layout_height="match_parent"
android:layout_weight="2"
android:onClick="onDigit"
android:text="@string/_0"/>
<Button
android:layout_margin="2dp"
android:id="@+id/btnCLR"
android:layout_width="0dp"
android:layout_height="match_parent"
android:layout_weight="1"
android:onClick="onDigit"
android:text="@string/clr"/>
<Button
android:layout_margin="2dp"
android:id="@+id/btnAdd"
android:layout_width="0dp"
android:layout_height="match_parent"
android:layout_weight="1"
android:onClick="onDigit"
android:text="@string/plus"/>
</LinearLayout>
<LinearLayout
android:layout_width="match_parent"
android:layout_height="wrap_content"
android:orientation="horizontal"
android:layout_weight="1"
>
<Button
android:layout_margin="2dp"
android:id="@+id/btnEqual"
android:layout_width="0dp"
android:layout_height="match_parent"
android:layout_weight="2"
android:onClick="onDigit"
android:text="@string/equal"/>
</LinearLayout>
</LinearLayout>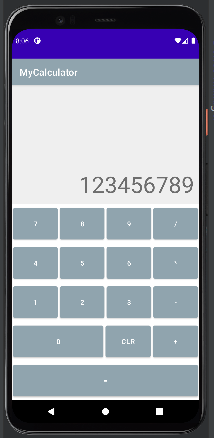
Linear Layout 을 통해 구성했다.
0과 같은 경우에는 weight을 2로 설정해줘서 간격을 맞춰줬다.
주요 색과 같은 경우에는 values 폴더에 themes 에서 따로 회색으로 변경해주었다.
이 프로젝트에서 소수점 기능은 어떻게 만들까?
Main.kt file 에 onDecimalPoint 라는 메소드를 하나 생성해둔 다음에 이 메소드를 호출함으로써 구현한다.
class MainActivity : AppCompatActivity() {

    var lastNumeric: Boolean = false
    var lastDot: Boolean = false


   private var tvInput:TextView?=null
    override fun onCreate(savedInstanceState: Bundle?) {
        super.onCreate(savedInstanceState)
        setContentView(R.layout.activity_main)
        tvInput = findViewById(R.id.tvInput)
    }

    fun onDigit(view: View){
     tvInput?.append((view as Button).text)
        lastNumeric = true
    }

    fun onClear(view: View){
    tvInput?.text = ""
        lastNumeric = false
        lastDot = false
    }

    fun onDecimalPoint(view: View)
    {
        if (lastNumeric && !lastDot) {
            tvInput?.append(".")
            lastNumeric = false // Update the status(flag)
            lastDot = true // Update the flag
        }
    }
핵심은 마지막은 숫자로 끝난다는 것이다. (소수점이 여러개일 수는 없다는 점을 확인해야한다.)
if 조건문을 이용해서 마지막 입력값이 숫자이고 소수점이 아니라는 조건을 건다(lastNumeric 과 lastDot 이라는 변수를 이용).
만약 조건이 만족하면 실행해야하는 건 소수점 추가를 하는 코드이다.
이렇게 lastNumeric 과 lastDot 처럼 지금 무언가가 활성 상태인지 정지 상태인지를 알려주는 것이
플래그 기능이라고 할 수 있다.
숫자를 계산하는 기능을 만들 때 고려할 점
- 숫자로 끝나지 않는경우나 공백은 연산이 불가능 하다.
- 음의 정수를 계산해야할 수 있어야 한다
- 연산자가 두개 이상 와도 계산이 가능해야 한다.( 2+2+2 )
let 문법
fun <T, R> T.let(block: (T) -> R): Rlet 함수는 타입 T의 확장 함수이다.
따라서 모든 타입의 객체에 체인 메소드 방식으로 사용할 수 있다.
let 함수는 람다식으로 중괄호를 채워서 이용한다.
그리고 let 함수는 스스로의 객체를 인자로 받아서 사용하는데 중괄호 내부에서 그 객체를 it 키워드로 호출이 가능하다.
fun main() {
    val a:String = "m"  // 먼저, let 함수를 사용할 객체를 선언합니다.

    a.plus("e").plus("o").plus("ru").let { it.plus("1"); print(it) }

    // 기존 코드
    // a.plus("e").plus("o").plus("ru").plus("1"); print(a.plus("e").plus("o").plus("ru").a)
}
it 키워드가 아니라 인자의 이름을 직접 명명할 수도 있다.
fun main() {
    val a:String = "meoru"

    a.let { str -> str.plus("1"); print(str) }
}
특히 세이프콜(Safe Call, "?.")을 이용해서 객체가 null 인 경우를 따로 처리해줄 수 있다.
fun main() {
var str:String? = null
str?.let {str = "-tech"}?: run{ str = "meoru" }
print(str)
str?.let {str = "-tech"}?: run{ str = "meoru" }
print(str)
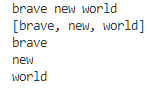
}문자열 자르기 split
split 함수를 이용하면 delimiter를 기준으로 문자열을 자를 수 있다.
예를들어 delimiter가 쉼표라면 문자열을 쉼표를 기준으로 자른다.
split의 리턴값은 List다.
문자열.split(vararg delimiters: Char, ignoreCase: Boolean = false, limit: Int = 0): List<String>위 인수 중 ignoreCase, limit는 생략 가능하며 생략시 기본값이 사용된다. 일반적인 경우는 delimiters만 지정하면 된다.
fun main() {
    var input = "brave new world"
    println(input) // brave new world
    var token = input.split(' '); // delimiter는 공백
    println(token) // brave, new, world
    println(token[0]) // brave
    println(token[1]) // new
    println(token[2]) // world
}
개수를 기준으로 문자열을 자를 땐 chunked 함수를 이용한다.
리턴값도 마찬가지로 list 다. size 에는 자를 개수를 입력한다.
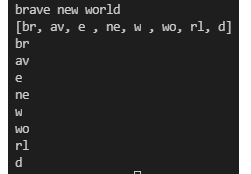
문자열.chunked(size: Int): List<String>fun main() {
var input = "brave new world"
println(input) // brave new world
var token = input.chunked(2);
println(token) // brave, new, world
println(token[0]) // br
println(token[1]) // av
println(token[2]) // e
println(token[3]) // ne
println(token[4]) // w
println(token[5]) // wo
println(token[6]) // rl
println(token[7]) // d
}
ref:
https://lktprogrammer.tistory.com/132
[Android] 안드로이드 - 리니어 레이아웃 (Linear Layout)
안드로이드(Android) 앱을 개발하기 위해서는 반드시 화면이 필요합니다. 그리고 화면에 보이는 구성 요소들은 모두 뷰(View)라고 부릅니다. 우리가 흔히 보는 Button, TextBox, Image 등은 모두 뷰(View)이
lktprogrammer.tistory.com
https://meoru-tech.tistory.com/36
💡 [Kotlin/코틀린] let 함수가 뭐죠?
let 함수의 정의 fun T.let(block: (T) -> R): R let 함수는 타입 T의 확장함수입니다. ※ 타입 T란? 따라서 모든 타입의 객체에 Chain Method(점(.)으로 이어나가는) 방식으로 사용할 수 있습니다. 반환 타입도..
meoru-tech.tistory.com